Tuesday, October 31, 2017

How to register Domain Name for FREE

How to get a Domain Name for free 


What is Domain Name:


A domain name is basically your website name. It is the address where Internet users can access your website. A domain name is used for finding / locating and identifying computers / machines on the Internet. As you are aware that Computers use IP addresses, which are a series of numbers. However, it is difficult for humans to remember strings of numbers. Because of this, domain names were developed and used to identify entities on the Internet rather than using IP addresses. 

A domain name can be any combination of letters and numbers, and it can be used in combination of the various domain name extensions, such as .com, .net, .ga, .gov, .in and more. 

Properties of Domain Name:

Domain name must be registered before you can use it. Since, every domain name is unique. NO two websites can have the same domain name. If someone types in www.yourdomainname.com or www.yourdomain.gov etc., it will go to your website and no one else's.


How to register Domain Name for free and create free website with own domain name

You can watch a Youtube video OR follow the step by step procedure below


Let see how to get Domain Name for free step by step below:

1. Browse URL freenom http://www.freenom.com
freenom home page

2. Enter your website name and click on “Check Availability” button.
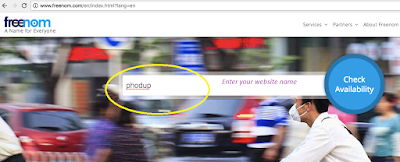
freenom website available

3. You can see list of available domains which paid and free. 
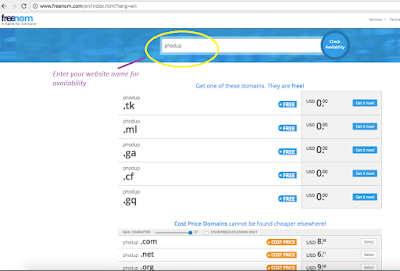
available domain name

4. Choose one which is Free , for example - Let say , i will choose domain with .ga
phodup.ga

5. Click on “Checkout” button.
6. Select “Use DNS” under “Use your new domain” and Enter IP Address 80.80.80.80 , 80.80.81.81 under “Enter your A record here”.
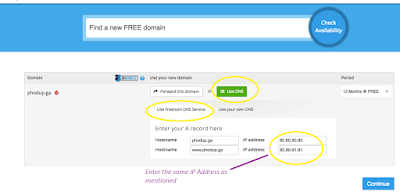
freenomworld

7. On the same page from the dropdown select “12 Months @ Free” under “Period” and click on continue.
8. On Review & Checkout Page - Enter your valid email address for login and verification or Would be good if you already logged into your Gmail or Facebook before attempting this step.
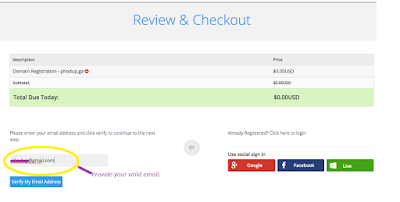
review and checkout page

9. Open your email and click on Confirmation link.
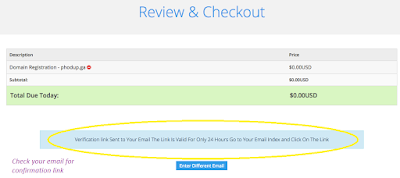
email confirmation message

10. Enter all the valid details as asked after clicking the verification link to complete the order.
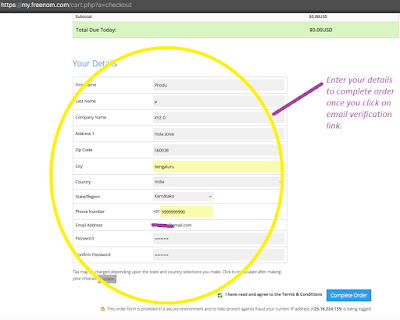
details page

11. Login with your credentials to freenom site.
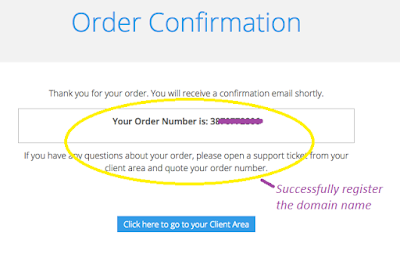
Freenom Order number

12. Change the settings or view the subscription or manage the domain can be done from “Service” menu.
purchased domain name

13. Hurray !! you have your own website name which is completely free, now you can play around with that.

14. You can also have option to upgrade or purchase the subscription once it’s over or you want to continue with the same name as Paid version has more advantages. 

15. You can also create as site with Freedom GoSite option which is available under Service-> My Domains -> Manage GoSite.
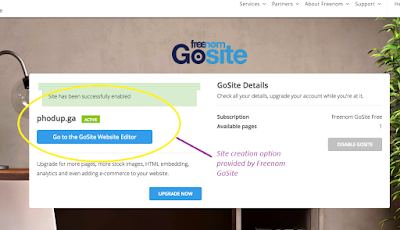
GoSite page

16. You can select theme and you can start your website up and running with 1 mins.


Hope you like this, please subscribe to my YouTube channel and blog.

That’s it.


Thank you!

Tuesday, October 24, 2017

FREE Hosting of a Wordpress site !!

How to create free WordPress blog

As we all want to have our own website someday and to achieve this we search for hosting servers to publish our contents. Since we are naive user or in the learning phase where we are doing things for the first time, we don't really like to spend money on that where we don't have an expertise.

If you search on Google ,you will find plenty of free hosting servers , blogging sites where you can publish / host your contents. To start with you can choose WordPress , Bloggers etc one of the most popular hosting and blogging site where you can publish your content for free but it has its own limitations like you can't do more customization or can’t install plugins which you want Or if they are providing for free, they will ask for credit card information which you are reluctant to give most of the times.
Let’s take an example of WordPress(for free version) - where you can’t install custom plugins, also you can’t monetize your site. Since WordPress is good hosting site if you are looking for blogging and monetization.
To get full fledge control of WordPress where you can do your experiments, monetize your contents or to get a glance of customization, you have to PAY few dollars monthly or yearly.

So, what if you get full control of WordPress by hosting it on your hosting server for FREE to get your hands dirty with your experiment, don’t you think it’s exciting. Yes it is.
Let’s proceed step by step on

How to host a Wordpress on hosting server:


You can watch a Youtube video OR follow the step by step procedure below


1. Go to 000webhost website https://www.000webhost.com/  which is powered by Hostinger.
2. Click on SignUp for free .
Web hosting

3. Enter valid details as shown in below screenshot and click on Get Free hosting button.

Get Free hosting

4. Click on “It’s ok, I want to learn” and proceed.


5. Open your email to confirm your email address for registration.

6. Now, login again or refresh the previous logged-In page.


7. Click on Build website option.


8. Scroll down you will see “Build Wordpress Website”, click on “Install Now “.
Wordpress free hosting

9. Provide valid username, password for accessing WordPress Admin page and Click on Install.
Wordpress Admin Login Page

10. Wait till the progress bar completes everything.

11. Click on “Go to Configuration page” – this will re-directs to Wordpress admin page.

12. Login to Wordpress admin page https://<replace_with_your_sitename>.000webhostapp.com/wp-login.php with username /password provided in Step 9.  
Wordpress Admin Page URL

13. To view your website – hit URL - https://<replace_with_your_sitename>.000webhostapp.com/

14. That’s ALL, you can do whatever you want to do from Admin panel like customization – theme you want to have, plugin you want to install etc.\
WordPress Admin Panel


15. WoooHooooo!!! – your WordPress Site is up and running.

As of now 000webhost provides you facility to create 2 website per account for free.

In case you want to delete any of your website, you can follow below steps.
1. Click on Settings-> General.
000webhost signup

2. Scroll down to the end.
3. Click on Delete button under “Delete WebSite” ( Be Careful)

That’s it .

Thank you!!

Sunday, September 17, 2017

Maven : How to configure Maven into your Windows Machine

Maven is a powerful tool that is used for projects build and dependency management. 
Let see how you can configure Maven into you Windows machine.

Step1 : Download the Maven binary from you offical site. 


Step2 : Extract the binary and save it in some location.
        Let say c:\users\qahumor\maven

Step3 : Now we have to set Environment Variable for Maven.
        Right-click on My Computer ->Properties -> Advanced System Settings.
        Under Advanced Tab -> Click on "Environment Variables".


Step4 : Then click on New in System Variables.

Step5: Provide Variable name = M2_Home and Variable value = path where you saved &
       extract the maven binary ,in this case c:\users\qahumor\maven
Step6 : Select Path variable in System Variables and click on Edit 
        (be careful while changing anything).

Step7 : Go to the end and enter value like - ;%M2_Home%\bin
        (make sure to put semi-colon incase if its not present) and hit OK.

Step8 : To check whether Maven is configured properly.
        Open command prompt and type these commands

       -> mvn -version  [To see the version of maven into your pc]
				&
       -> mvn clean  [This is command to clean the project , you will see Build Failure ,
                      this is expected as you don't have POM.xml file as of now]
		
Thank you!!

Java : How to read data from properties file

How to read data from properties file


The Properties class represents a persistent or defined set of properties. The Properties can be saved to a stream or loaded from a stream. Each key and its corresponding value in the property list is a string.
Because Properties inherits from Hashtable, the put and putAll methods can be applied to a Properties object.

The Properties file is highly used in automation. Let see with an example.

package com.qahumor;

import java.io.FileInputStream;
import java.io.FileNotFoundException;
import java.util.Properties;

public class Reading_PropertyFile {

 /*
  * @author : Qahumor Reading Properties file in Java
  */

public static void main(String[] args) {

// Create an Object of Properties class.
Properties prop = new Properties();

// Get the path of properties file which you have created in your project.
// System.getProperty("user.dir") - help to read the root directory of your project.
// Change the below path accordingly.
String path = System.getProperty("user.dir") + "/src/config/test.properties";

// Print the path of file for Debug purpose
System.out.println("Debug : Properties file path :" + path);

try {

// Reading the File input stream
 FileInputStream fs = new FileInputStream(path);

// Load the file into memory
 prop.load(fs);
   
} catch (Exception e) {
 e.printStackTrace();
}

// Read the value from Property file - test.properties
System.out.println("\nVersion of the Property file is : " 
    + prop.getProperty("version"));

}

}

Output:

Version of the Property file is : 3.1.4


@@@@@@@@@@@@@@@@@@@@@@@@@@@@@@@@@@@@@@@@@@@@@@@@@@@@@

To create a property file:
1. You can open a notepad
2. Type below content in it.
    version=3.1.4
    login=admin
    pswd=xxxx
3. Save it name "test.properties" in double quotes.
4. You can download the sample property file from Link


Thank you!!


Saturday, September 2, 2017

How to create Firefox profile on Windows OS

How to create Firefox profile


Sometime we need to create different profile other than default profile 
of Firefox for new users or for any troubleshooting or for web automation.

To do this Firefox provide -P option to create new profile. 

Let's see how to achieve this.

You can watch Youtube video or follow the steps mentioned below


Step1: Make sure you close all the running firefox instance on your system.


Step2: Now press Windows+R to open RUN window.


Step3: Now type " firefox -P "  or "firefox.exe -P" and hit enter.


Step4: It will open "Firefox - Choose user Profile "  window.


Step5: Click on "Create Profile" option , it will open "Create Profile Window"
       then click  on Next button.


Step6: Provide the new profile name and choose the folder(if you would like to
       place the profile in some custom folder) and click on Finish.


Step7: Now you can see the newly created profile . Select and click on 
       "Start Firefox" button and navigate to folder (either default or custom
       folder) where you have placed the profile, you can see lots of files 
       got created in it.   


You can subscribe to my Youtube channel @ QAHUMOR


That's it , let me know if you have any comments.


Linux: How to change OS language via terminal?

  In this post , I will be talking about how to change language of Linux OS from Terminal . If you are not a frequent user of Linux and str...