Explore the Latest in Tech & Automation: Android, iOS, Mobile Testing with Appium, Web Automation using Selenium, Python & Java Programming, Robot Framework, Shell & PowerShell Scripting, QA Tools, Spring Boot Development, Agentic AI Innovations, Free Software Resources, and Expert Tips on Designing Scalable Automation Frameworks.
Showing posts with label Mobile Automation. Show all posts
Showing posts with label Mobile Automation. Show all posts
How to get the package name of Android application
There are multiple ways in which we can obtain the package name of Android .apk file. Here are the some quick ways to get the package name. Step 1 : If its public app and available in https://play.google.com/store/apps , then search the app name and click on that particular app. you will get the package name as shown in below screenshot.
Demo of Step 1 :
Step 2 : Install the app on your device and run the below command to get the list of packages and search for your app. *(Make sure ADB configured in your path variable, click here to know how to configure adb on Windows , For Mac - you can click here) -> adb shell pm list packages
Demo of Step 2 :
Step 3 : Again using the Android command , you can get the details of app , package name -> aapt dump badging <path of apk> | grep <any_relevant_search_text>
for example : -> aapt dump badging D:\facebook.app | grep package
** aapt stands for Android Asset Packaging Tool . Demo of Step 3 :
Step 4 : [This step is now obsolete, as Appium UI has changed , if you have OLD Appium setup , you can still use it ] If you have Appium installed and locate the .apk file and it will list the package name as shown in below screenshot.
You can choose any above mentioned steps to get the package name of your app. Some other ways are also present to get the app name.But here i listed few easy way to get the package name. If you like this, please subscribe my Youtube channel,like ,comments & share.
Mac OS : How to configure JAVA Home ,Maven & Android Home
Recently I
have started using Mac OS and I had to
configure my Development environment for automation . To get started with the
basic needs i.e basic program to run , my system should have been configured
with JAVA_HOME , ANDROID_HOME and Maven(M2_HOME).
I learnt
the way how to configure all these settings, so I am sharing my knowledge in a
best possible way which can be understood easily. Also watch out my Youtube
Channel for videos related to this (link is given below)
Make sure
you have all these binaries installed or are downloaded and kept it in some
location.
Let’s get
started with configuring these settings in OS path.
You can watch a Youtube video OR follow the step by step procedure below Part 1
Part 2
Step 1 : Open Terminal on your Mac.
Step 2 : Typecd ~/
Step 3 : Check whether you have
.bash_profile present, type command
$ ls –al
Step 4 : If it is not present , let’s
create it using command
$ touch .bash_profile
(**
touch is a standard
Unix command-line interface program in its default usage, it is
equivalent of creating or opening a file and saving it without any change to
the file contents.)
Step 5 : Hit command ls –al again to
verify its presence
Step 6 : Now open .bash_profile file
which is just created. And to open you can use either of the commands.
$ open –e .bash_profile
( **
-e Opens with TextEdit.
-t Opens
with default text editor. )
OR
$ nano .bash_profile
(** GNU nano is
a popular commandline text editor used on many operating
systems.)
Above steps
are common steps for configuring anything in PATH
Step 7 : How to configure JAVA_HOME
(You are required to give bin and
jre path . Make sure to replace wth your path)
Maven is a powerful tool that is used for projects build and dependency management.
Let see how you can configure Maven into you Windows machine.

Step1 : Download the Maven binary from you offical site.
Step2 : Extract the binary and save it in some location.
Let say c:\users\qahumor\maven
Step3 : Now we have to set Environment Variable for Maven.
Right-click on My Computer ->Properties -> Advanced System Settings.
Under Advanced Tab -> Click on "Environment Variables".
Step4 : Then click on New in System Variables.
Step5: Provide Variable name = M2_Home and Variable value = path where you saved &
extract the maven binary ,in this casec:\users\qahumor\maven
Step6 : Select Path variable in System Variables and click on Edit
(be careful while changing anything).
Step7 : Go to the end and enter value like - ;%M2_Home%\bin(make sure to put semi-colon incase if its not present) and hit OK.
Step8 : To check whether Maven is configured properly.
Open command prompt and type these commands
-> mvn -version [To see the version of maven into your pc]
&
-> mvn clean [This is command to clean the project , you will see Build Failure ,
this is expected as you don't have POM.xml file as of now]
The Properties class represents a persistent or defined set of properties. The Properties can be saved to a stream or loaded from a stream. Each key and its corresponding value in the property list is a string.
Because Properties inherits from Hashtable, the put and putAll methods can be applied to a Properties object.
The Properties file is highly used in automation. Let see with an example.
package com.qahumor;
importjava.io.FileInputStream;
importjava.io.FileNotFoundException;
importjava.util.Properties;
publicclassReading_PropertyFile {
/* * @author : Qahumor Reading Properties file in Java */publicstaticvoidmain(String[] args) {
// Create an Object of Properties class.
Properties prop = new Properties();
// Get the path of properties file which you have created in your project.// System.getProperty("user.dir") - help to read the root directory of your project.
// Print the path of file for Debug purpose
System.out.println("Debug : Properties file path :" + path);

try {

// Reading the File input stream
 FileInputStream fs = new FileInputStream(path);

// Load the file into memory
 prop.load(fs);

} catch (Exception e) {
 e.printStackTrace();
}

// Read the value from Property file - test.properties
System.out.println("\nVersion of the Property file is : "
    + prop.getProperty("version"));

}

}
How to get the activity name of android application
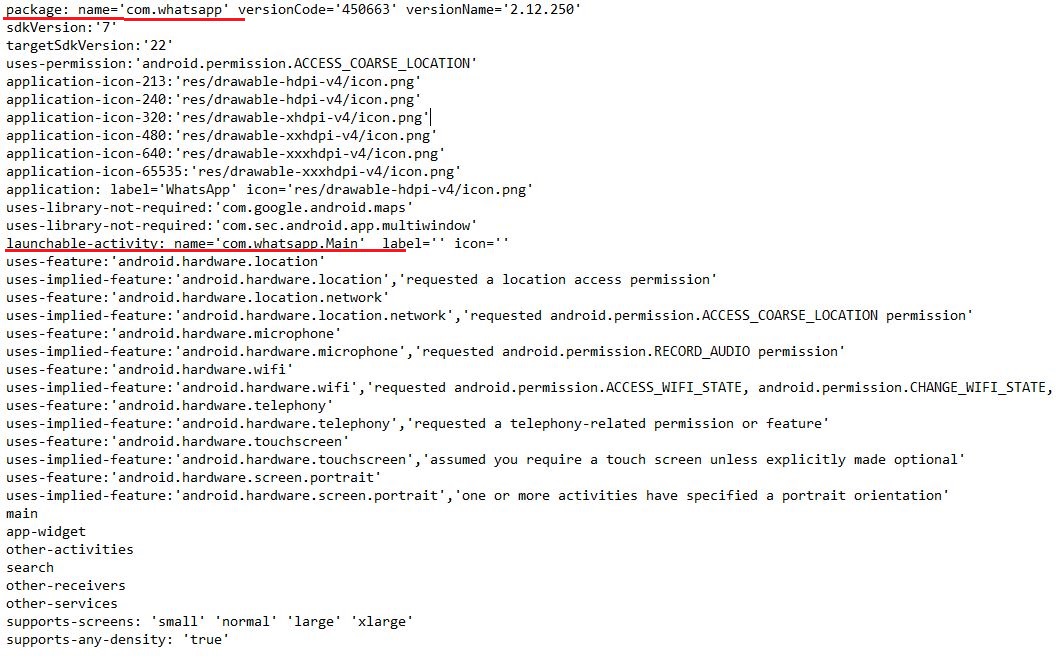
For mobile app automation, Appium requires app activity name (usually the first screen of your app when you tap on app to launch it ) in desired capabilities parameter . To get the app activity name which Appium can use while launching an app. here are the ways you can use to get the same
Step 1 : using the aapt command.
To get the aapt.exe , you have to navigate to android sdk folder then build-tools and goto some api version . for example(specific to my machine)
E:\Android\adt\sdk\build-tools\android-4.4W
open command prompt and run the below command
- aapt dump badging
for example : Let's take whatsapp application
- aapt dump badging E:\com.whatsapp.apk
output :
You can get the package name and launchable-activity with other details as highlighted in below :
In this Part 3 , we are talking about iOS Simulator command line commands.
How this will be helpful in automation:
This will helpful in checking/verifying your iOS app whether it’s working fine without Appium or any other automation tool in picture. Once you find your app works well then you can go for automation with Appium, this is just to save your time from unnecessary troubleshooting.
Here we start with some useful and important commands
1. To get the list of Simulators available in your system , you can type below command
-> Open Terminal and type below command
$ xcrun instruments -s
2. To launch Simulator using command line , you can type below command and provide same of simulator as you got from step 1 above
-> Open Terminal and type below command
$ xcrun instruments -w "iPhone 6 (9.2)” // replace with your Simulator name
3. To install app on Simulator using command line once Simulator is up and running, you can type below command