Showing posts with label SDET. Show all posts

Saturday, November 25, 2017

Android : How to get the package name of Android application

How to get the package name of Android application


There are multiple ways in which we can obtain the package name of Android .apk file. 
Here are the some quick ways to get the package name.


Step 1 : If its public app and available in https://play.google.com/store/apps , then search the app name and click on that particular app. you will get the package name as shown in below screenshot.


Demo of Step 1 :


Step 2 : Install the app on your device and run the below command to get the list of packages and search for your app. 
 *(Make sure ADB configured in your path variable, click here to know how to configure adb on Windows , For Mac - you can click here )

-> adb shell pm list packages 


Demo of Step 2 :


Step 3 : Again using the Android command , you can get the details of app , package name

-> aapt dump badging <path of apk> | grep <any_relevant_search_text>

for example :
-> aapt dump badging D:\facebook.app | grep package


   ** aapt stands for Android Asset Packaging Tool .


Demo of Step 3 :


Step 4 : [This step is now obsolete, as Appium UI has changed , if you have OLD Appium setup , you can still use it ] If you have Appium installed and locate the .apk file and it will list the package name as shown in below screenshot.


You can choose any above mentioned steps to get the package name of your app. Some other ways are also present to get the app name.But here i listed few easy way to get the package name. 

If you like this, please subscribe my Youtube channel,like ,comments & share.

Sunday, September 17, 2017

Maven : How to configure Maven into your Windows Machine

Maven is a powerful tool that is used for projects build and dependency management. 
Let see how you can configure Maven into you Windows machine.

Step1 : Download the Maven binary from you offical site. 


Step2 : Extract the binary and save it in some location.
        Let say c:\users\qahumor\maven

Step3 : Now we have to set Environment Variable for Maven.
        Right-click on My Computer ->Properties -> Advanced System Settings.
        Under Advanced Tab -> Click on "Environment Variables".


Step4 : Then click on New in System Variables.

Step5: Provide Variable name = M2_Home and Variable value = path where you saved &
       extract the maven binary ,in this case c:\users\qahumor\maven
Step6 : Select Path variable in System Variables and click on Edit 
        (be careful while changing anything).

Step7 : Go to the end and enter value like - ;%M2_Home%\bin
        (make sure to put semi-colon incase if its not present) and hit OK.

Step8 : To check whether Maven is configured properly.
        Open command prompt and type these commands

       -> mvn -version  [To see the version of maven into your pc]
				&
       -> mvn clean  [This is command to clean the project , you will see Build Failure ,
                      this is expected as you don't have POM.xml file as of now]
		
Thank you!!

Sunday, August 28, 2016

Appium : How to start Appium server using command line

How to start Appium server using command line 


This is very common scenario where you will be needed to trigger/start Appium server either using command line or trigger through .bat file in automation.
I will explain here step by step how to do this and creating a .bat file in the end.

*** You can download batch file from here “appiumserver”(see explanation below)

To do this, please follow the below steps:

 Step 1: Make sure you have Node installed (if not, download it fromlink )  and would be good if
              you configured in your path variable, such that you can run node  from anywhere in your pc
              .It will be helpful in your automation.

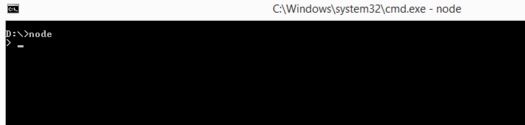
Type node in command prompt, you will see like below screenshot (if it configured properly)
C :\> node        


 Step 2: Make sure you have Appium server is installed.

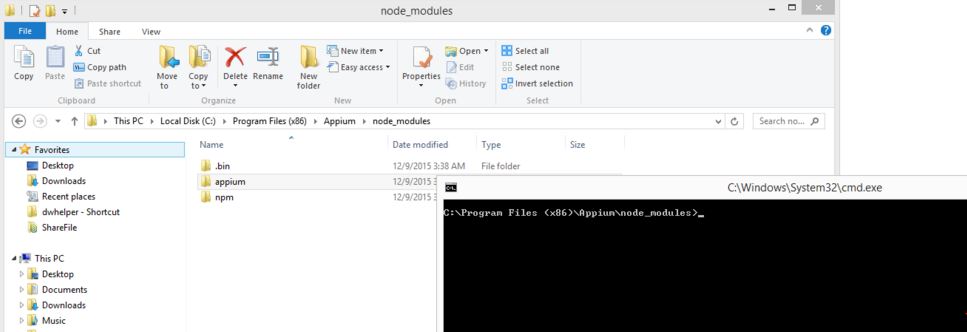
 Step 3: Open Command Prompt and navigate to Appium folder till below path(based on your
              machine ,path may change)
C:\Program Files (x86)\Appium\node_modules


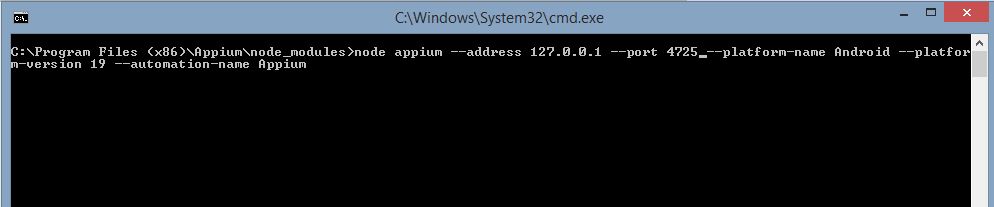
 Step 4: Now run below command, with Appium server argument which you think to be part of it, I
              have passed minimum argument, based on your requirement you can add more.

 -> node appium --address 127.0.0.1 --port 4725 --platform-name Android --platform-version 19 --automation-name Appium


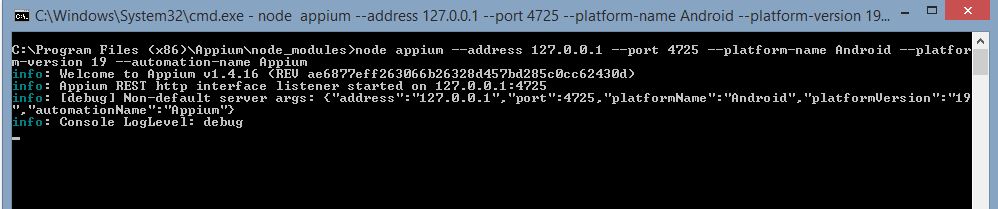
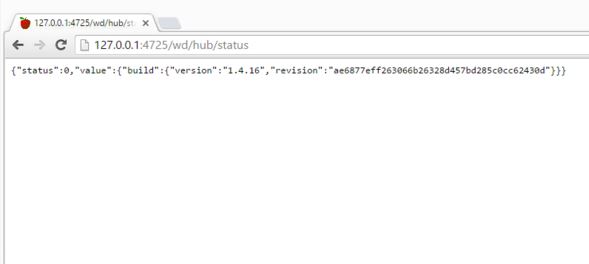
You can see Appium started at port 4725 , 


You can also verify one step ahead by hitting the below URL in your browser
http://127.0.0.1:4725/wd/hub/status 


Step 5:  Creating a batch file, this will make your life little easier in setup and running Appium script.
              Open notepad and paste below code and save it as "appiumserver.bat"
REM ############################################################################ 
REM ## START

echo "navigating to Appium folder"
REM ## change the folder path , based on your machine
cd /D C:/Appium/Appium/node_modules
node appium --address 127.0.0.1 --port 4725 --platform-name Android --platform-version 19 --automation-name Appium

REM ##END
REM############################################################################

You can download it from here “appiumserver

Comment down below for any questions.


Monday, June 13, 2016

Automation : How to map network drive and save file to a shared location using AutoIT and Powershell.


 This is a sample script which lets you map your network share to your windows 
 machine/system. 
 This can be used/helpful in your scripting where you want to save your results 
 in a shared folder once you are done with test execution.

 - Tools used here is AutoIT , which helps in triggering powershell commands on 
   windows machine and opens notepad and save it to network share.
 - Benefit of using AutoIT is that you can create .exe file and can be run/trigger 
   from remote using .bat file etc. 

;#----------------------------------------------------------------------------  
;## Script Function:
;## To map network drive and open Notepad and save file to a shared location.

;##@author : P programs
;##----------------------------------------------------------------------------

Run("powershell.exe")
Sleep(1000)

;send("net use : \\\shared_folder_name  /User:")
send("net use o: \\10.20.30.40\results secretPassword /User:userdemo1")

Send("{ENTER}")
Send("exit")
Send("{ENTER}")
;WinClose("powershell.exe")
sleep(1000)
Run("notepad.exe")
$handle = WinWaitActive("[CLASS:Notepad]","")
WinSetState("[CLASS:Notepad]","",@SW_MAXIMIZE)
sleep(160000)
Send("Hello there")
WinClose($handle)
$handle = WinGetHandle("[ACTIVE]")
ControlClick($handle,"","[CLASS:Button; INSTANCE:1]")
$handle = WinWaitActive("[CLASS:#32770]","")
$hw = WinGetHandle("[ACTIVE]")
ControlSetText($hw, "", "ComboBox1", "O:\results")
ControlSend($hw,"","ComboBox3","UTF-8")
;sleep(2000)
ControlClick($hw,"","[CLASS:Button; INSTANCE:1]") ;to click on the button


Reference links: http://ss64.com/nt/net_share.html
                 http://ss64.com/nt/net_use.html


Wednesday, January 13, 2016

Appium : How to get the activity name of android application

How to get the activity name of android application


For mobile app automation, Appium requires app activity name (usually the first screen of your app when you tap on app to launch it ) in desired capabilities parameter . To get the app activity name which Appium can use while launching an app. here are the ways you can use to get the same  

Step 1 : using the aapt command.

To get the aapt.exe , you have to navigate to android sdk folder then build-tools and goto some api version . for example(specific to my machine) 
E:\Android\adt\sdk\build-tools\android-4.4W 

open command prompt and run the below command 
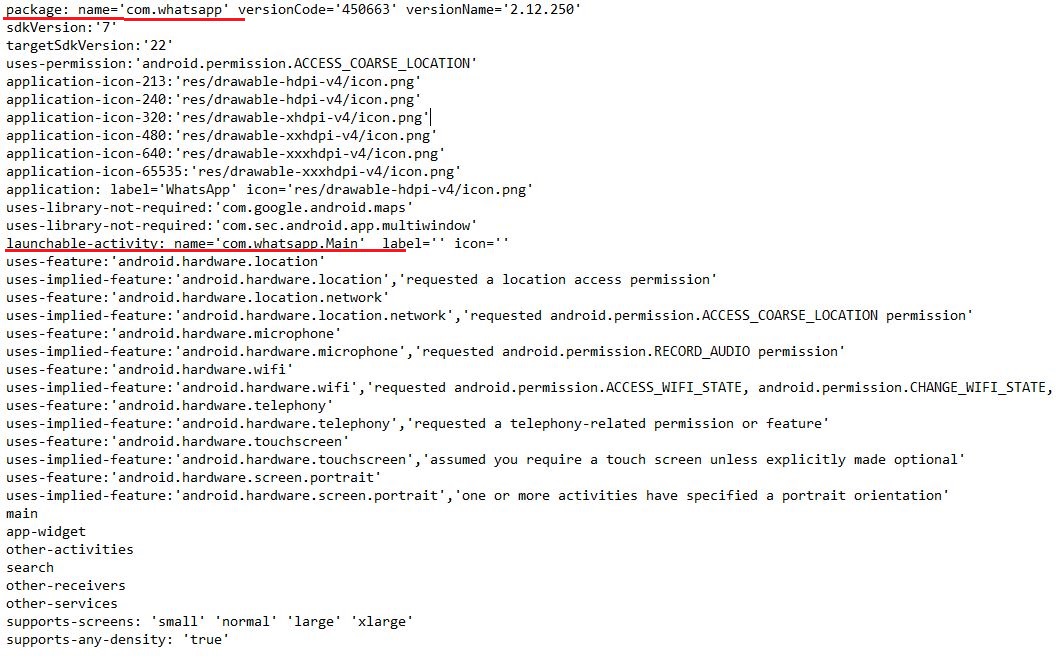
aapt dump badging

for example : Let's take whatsapp application
aapt dump badging E:\com.whatsapp.apk

output :
You can get the package name and launchable-activity with other details as highlighted in below :


Step 2: using Appium UI console


Sunday, December 27, 2015

Appium : Step by step Native IOS App Automation - Part 3(iOS Simulator)

In this Part 3 , we are talking about iOS Simulator command line commands.

How this will be helpful in automation:
This will helpful in checking/verifying your iOS app whether it’s working fine without Appium or any other automation tool in picture. Once you find your app works well then you can go for automation with Appium, this is just to save your time from unnecessary troubleshooting.

Here we start with some useful and important commands

1. To get the list of Simulators available in your system , you can type below command
-> Open Terminal and type below command
                        xcrun instruments -s

2. To launch Simulator using command line , you can type below command and provide same of simulator as you got from step 1 above
-> Open Terminal and type below command
$ xcrun instruments -w "iPhone 6 (9.2)”   // replace with your Simulator name

3. To install app on Simulator using command line once Simulator is up and running, you can type below command
-> Open Terminal and type below command
                        xcrun simctl install booted <app path>
                  e.g xcrun simctl install booted /Users/macuser/Desktop/UIKitCatalog.app

4. To launch an installed app on your simulator , type below command(you can also click/tap the app and launch in simulator using mouse )
-> Open Terminal and type below command
                        xcrun simctl launch booted <app identifier>  

// To get an app identifier or Bundle Identifier you can get it from info.plist file
     e.g xcrun simctl launch booted com.example.apple-samplecode.UIKitCatalog


if you are interested to learn more about all available subcommands you can get by running
          $ xcrun simctl

Hope this helps to get acquainted yourself with basic as well as important iOS simulator commands.click here for Part 2

In Part 4 , we will see the sample demo program of iOS Native App automation using Appium. Stay tuned.


Appium : Step by step Native IOS App Automation - Part 2 (Xcode)


In this Part 2, we are learning about Xcode usage like - building a project, running an application on iOS Simulator.

As you know Xcode is IDE provided for Apple software development. Once you build your project, you can deploy your app on Simulator. 

Now we start with creating a project in Xcode. Since we will be working with Sample IOS Application (UICatalog) which can be downloaded from link provided in Part 1


1. Once you download UICatalog Sample Code, go to the folder and click on UIKitCatalog.xcodeproj


2. It will open in Xcode and looks like this


3.Now on Xcode click on: Product -> Build for -> Testing and you will observe build Succeeded message

4. Again go to Product menu and click on Run, you will see iOS Simulator booting up.
 (Make sure to choose installed simulator on your Mac OS using - Product->Destination->IOS Simulator on Xcode)

5. You can see UIKitCatalog app installed on your iOS Simulator 

If you want to add more devices (iOS simulators), you can go to 

  On Xcode :  Window ->Devices , it will open a Devices Windows


You can go to bottom-left and click on + sign and add your simulator.

Hope this helps, click here for Part 1


Please stay tuned for Part 3, where you will learn running iOS simulator using command line etc.

Testing a New Product: Essential Information Software Testers Must Gather in the AI Era

    Learn what information software testers must gather before starting testing a new product, including AI, automation, compatibility, and ...