Explore the Latest in Tech & Automation: Android, iOS, Mobile Testing with Appium, Web Automation using Selenium, Python & Java Programming, Robot Framework, Shell & PowerShell Scripting, QA Tools, Spring Boot Development, Agentic AI Innovations, Free Software Resources, and Expert Tips on Designing Scalable Automation Frameworks.
Maven is a powerful tool that is used for projects build and dependency management.
Let see how you can configure Maven into you Windows machine.

Step1 : Download the Maven binary from you offical site.
Step2 : Extract the binary and save it in some location.
Let say c:\users\qahumor\maven
Step3 : Now we have to set Environment Variable for Maven.
Right-click on My Computer ->Properties -> Advanced System Settings.
Under Advanced Tab -> Click on "Environment Variables".
Step4 : Then click on New in System Variables.
Step5: Provide Variable name = M2_Home and Variable value = path where you saved &
extract the maven binary ,in this casec:\users\qahumor\maven
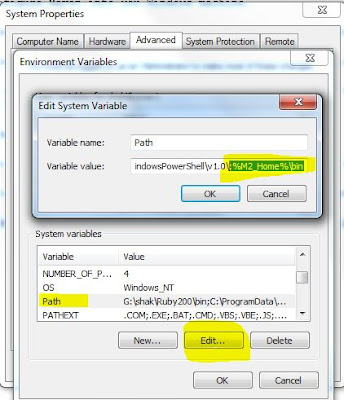
Step6 : Select Path variable in System Variables and click on Edit
(be careful while changing anything).
Step7 : Go to the end and enter value like - ;%M2_Home%\bin(make sure to put semi-colon incase if its not present) and hit OK.
Step8 : To check whether Maven is configured properly.
Open command prompt and type these commands
-> mvn -version [To see the version of maven into your pc]
&
-> mvn clean [This is command to clean the project , you will see Build Failure ,
this is expected as you don't have POM.xml file as of now]
The Properties class represents a persistent or defined set of properties. The Properties can be saved to a stream or loaded from a stream. Each key and its corresponding value in the property list is a string.
Because Properties inherits from Hashtable, the put and putAll methods can be applied to a Properties object.
The Properties file is highly used in automation. Let see with an example.
package com.qahumor;
importjava.io.FileInputStream;
importjava.io.FileNotFoundException;
importjava.util.Properties;
publicclassReading_PropertyFile {
/* * @author : Qahumor Reading Properties file in Java */publicstaticvoidmain(String[] args) {
// Create an Object of Properties class.
Properties prop = new Properties();
// Get the path of properties file which you have created in your project.// System.getProperty("user.dir") - help to read the root directory of your project.
// Print the path of file for Debug purpose
System.out.println("Debug : Properties file path :" + path);

try {

// Reading the File input stream
 FileInputStream fs = new FileInputStream(path);

// Load the file into memory
 prop.load(fs);

} catch (Exception e) {
 e.printStackTrace();
}

// Read the value from Property file - test.properties
System.out.println("\nVersion of the Property file is : "
    + prop.getProperty("version"));

}

}