Showing posts with label Testing. Show all posts

Sunday, September 17, 2017

Maven : How to configure Maven into your Windows Machine

Maven is a powerful tool that is used for projects build and dependency management. 
Let see how you can configure Maven into you Windows machine.

Step1 : Download the Maven binary from you offical site. 


Step2 : Extract the binary and save it in some location.
        Let say c:\users\qahumor\maven

Step3 : Now we have to set Environment Variable for Maven.
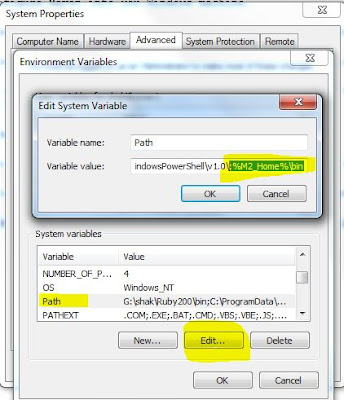
        Right-click on My Computer ->Properties -> Advanced System Settings.
        Under Advanced Tab -> Click on "Environment Variables".


Step4 : Then click on New in System Variables.

Step5: Provide Variable name = M2_Home and Variable value = path where you saved &
       extract the maven binary ,in this case c:\users\qahumor\maven
Step6 : Select Path variable in System Variables and click on Edit 
        (be careful while changing anything).

Step7 : Go to the end and enter value like - ;%M2_Home%\bin
        (make sure to put semi-colon incase if its not present) and hit OK.

Step8 : To check whether Maven is configured properly.
        Open command prompt and type these commands

       -> mvn -version  [To see the version of maven into your pc]
				&
       -> mvn clean  [This is command to clean the project , you will see Build Failure ,
                      this is expected as you don't have POM.xml file as of now]
		
Thank you!!

Java : How to read data from properties file

How to read data from properties file


The Properties class represents a persistent or defined set of properties. The Properties can be saved to a stream or loaded from a stream. Each key and its corresponding value in the property list is a string.
Because Properties inherits from Hashtable, the put and putAll methods can be applied to a Properties object.

The Properties file is highly used in automation. Let see with an example.

package com.qahumor;

import java.io.FileInputStream;
import java.io.FileNotFoundException;
import java.util.Properties;

public class Reading_PropertyFile {

 /*
  * @author : Qahumor Reading Properties file in Java
  */

public static void main(String[] args) {

// Create an Object of Properties class.
Properties prop = new Properties();

// Get the path of properties file which you have created in your project.
// System.getProperty("user.dir") - help to read the root directory of your project.
// Change the below path accordingly.
String path = System.getProperty("user.dir") + "/src/config/test.properties";

// Print the path of file for Debug purpose
System.out.println("Debug : Properties file path :" + path);

try {

// Reading the File input stream
 FileInputStream fs = new FileInputStream(path);

// Load the file into memory
 prop.load(fs);
   
} catch (Exception e) {
 e.printStackTrace();
}

// Read the value from Property file - test.properties
System.out.println("\nVersion of the Property file is : " 
    + prop.getProperty("version"));

}

}

Output:

Version of the Property file is : 3.1.4


@@@@@@@@@@@@@@@@@@@@@@@@@@@@@@@@@@@@@@@@@@@@@@@@@@@@@

To create a property file:
1. You can open a notepad
2. Type below content in it.
    version=3.1.4
    login=admin
    pswd=xxxx
3. Save it name "test.properties" in double quotes.
4. You can download the sample property file from Link


Thank you!!


Saturday, September 2, 2017

How to create Firefox profile on Windows OS

How to create Firefox profile


Sometime we need to create different profile other than default profile 
of Firefox for new users or for any troubleshooting or for web automation.

To do this Firefox provide -P option to create new profile. 

Let's see how to achieve this.

You can watch Youtube video or follow the steps mentioned below


Step1: Make sure you close all the running firefox instance on your system.


Step2: Now press Windows+R to open RUN window.


Step3: Now type " firefox -P "  or "firefox.exe -P" and hit enter.


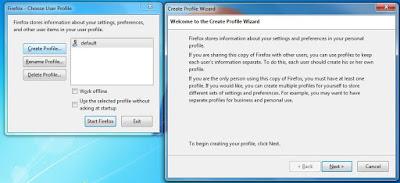
Step4: It will open "Firefox - Choose user Profile "  window.


Step5: Click on "Create Profile" option , it will open "Create Profile Window"
       then click  on Next button.


Step6: Provide the new profile name and choose the folder(if you would like to
       place the profile in some custom folder) and click on Finish.


Step7: Now you can see the newly created profile . Select and click on 
       "Start Firefox" button and navigate to folder (either default or custom
       folder) where you have placed the profile, you can see lots of files 
       got created in it.   


You can subscribe to my Youtube channel @ QAHUMOR


That's it , let me know if you have any comments.


Sunday, August 20, 2017

How to create your laptop a Wi-Fi hotspot in 2 simple clicks

How to create your laptop a Wi-Fi hotspot


Sometimes we are required to create Wi-Fi hotspot to share internet with our friends or someone else whom you know or not. So i listed few reasons for the same when we need Wi-Fi hotspot below :

1. If you want to provide an access to your Wi-Fi for a limited period of time and incase  you don't want to reveal /share your original password to your friend or strangers.


2. If you have laptop which is connected to some Wi-Fi whose password is not known to you and you want to connect your mobile to access Wi-Fi.

3. Incase you need to test some scenario with Fancy Wi-Fi Name or long Wi-Fi name or Unicode Wi-Fi name etc.

You can use the Baidu Wi-Fi hotspot software to resolve all the above points.

You can download and install the Baidu Wi-Fi hotspot software from : http://filehippo.com/download_baidu-wifi-hotspot/ 

Once its get installed , you can create  WiFi name and password of your choice .


** You can also use this software to send file or receive file from phone.

You can watch Youtube video (in Hindi though but can be easily understandable)  for demo


Thanks,
QA Humor

Sunday, August 28, 2016

Appium : How to start Appium server using command line

How to start Appium server using command line 


This is very common scenario where you will be needed to trigger/start Appium server either using command line or trigger through .bat file in automation.
I will explain here step by step how to do this and creating a .bat file in the end.

*** You can download batch file from here “appiumserver”(see explanation below)

To do this, please follow the below steps:

 Step 1: Make sure you have Node installed (if not, download it fromlink )  and would be good if
              you configured in your path variable, such that you can run node  from anywhere in your pc
              .It will be helpful in your automation.

Type node in command prompt, you will see like below screenshot (if it configured properly)
C :\> node        


 Step 2: Make sure you have Appium server is installed.

 Step 3: Open Command Prompt and navigate to Appium folder till below path(based on your
              machine ,path may change)
C:\Program Files (x86)\Appium\node_modules


 Step 4: Now run below command, with Appium server argument which you think to be part of it, I
              have passed minimum argument, based on your requirement you can add more.

 -> node appium --address 127.0.0.1 --port 4725 --platform-name Android --platform-version 19 --automation-name Appium


You can see Appium started at port 4725 , 


You can also verify one step ahead by hitting the below URL in your browser
http://127.0.0.1:4725/wd/hub/status 


Step 5:  Creating a batch file, this will make your life little easier in setup and running Appium script.
              Open notepad and paste below code and save it as "appiumserver.bat"
REM ############################################################################ 
REM ## START

echo "navigating to Appium folder"
REM ## change the folder path , based on your machine
cd /D C:/Appium/Appium/node_modules
node appium --address 127.0.0.1 --port 4725 --platform-name Android --platform-version 19 --automation-name Appium

REM ##END
REM############################################################################

You can download it from here “appiumserver

Comment down below for any questions.


Monday, June 13, 2016

Automation : How to map network drive and save file to a shared location using AutoIT and Powershell.


 This is a sample script which lets you map your network share to your windows 
 machine/system. 
 This can be used/helpful in your scripting where you want to save your results 
 in a shared folder once you are done with test execution.

 - Tools used here is AutoIT , which helps in triggering powershell commands on 
   windows machine and opens notepad and save it to network share.
 - Benefit of using AutoIT is that you can create .exe file and can be run/trigger 
   from remote using .bat file etc. 

;#----------------------------------------------------------------------------  
;## Script Function:
;## To map network drive and open Notepad and save file to a shared location.

;##@author : P programs
;##----------------------------------------------------------------------------

Run("powershell.exe")
Sleep(1000)

;send("net use : \\\shared_folder_name  /User:")
send("net use o: \\10.20.30.40\results secretPassword /User:userdemo1")

Send("{ENTER}")
Send("exit")
Send("{ENTER}")
;WinClose("powershell.exe")
sleep(1000)
Run("notepad.exe")
$handle = WinWaitActive("[CLASS:Notepad]","")
WinSetState("[CLASS:Notepad]","",@SW_MAXIMIZE)
sleep(160000)
Send("Hello there")
WinClose($handle)
$handle = WinGetHandle("[ACTIVE]")
ControlClick($handle,"","[CLASS:Button; INSTANCE:1]")
$handle = WinWaitActive("[CLASS:#32770]","")
$hw = WinGetHandle("[ACTIVE]")
ControlSetText($hw, "", "ComboBox1", "O:\results")
ControlSend($hw,"","ComboBox3","UTF-8")
;sleep(2000)
ControlClick($hw,"","[CLASS:Button; INSTANCE:1]") ;to click on the button


Reference links: http://ss64.com/nt/net_share.html
                 http://ss64.com/nt/net_use.html


Sunday, August 2, 2015

Testing : Key information gathering before you start testing/involving in a new product


I have been testing product from more than 7+ years and seen people specially freshers or test-leads who recently started handling projects facing problem initially in information gathering of product . In IT industry as we all know that teams are spread across the globe who are working on similar project. And getting same/all information's about product at once is a big headache. Most the time meeting happens at a time which does not suits to your timing and you may miss some critical updates /schedule or information or didn't follow your mails because of some or the other reasons. Ultimately you won't be having all the required information's of product at one place as it spreads across your email. So based on my experience and the issue faced , I jotted down some key questions which we can ask to Project Managers or Stake holders or leads(in case of fresher) before we start testing/involving in a product.

1- Ask for product functional specification.

2- What are the new features added to product?(applicable for product having incremental release)

3- Availability of reading stuffs includes any product document ,admin guide ,videos, hands-on docs etc

4- Ask for project milestone which includes CC/FF/SI/RC/RTM date etc.

5- Supported language of the product(if your product supports MUI)

6- Supported platforms of the product i.e. OS(32 or 64 bit )/Browser/Versions/Mobile devices etc

7- Ask for build location , from which branch build should be picked like main branch, staging etc.

8- Is the build available via Testfairy, Jenkins or ask for share location where builds are kept.

9- Which tool is used to maintain the stories of new features like JIRA, AtTask etc , if you are following agile methodologies .

10- What is the target version of product

11- Ask for Upgrade scenario. For example

              11.1- build to build upgrade is supported or not.

              11.2- Upgrade from previous version is supported or not.

              11.3- downgrade to previous version is supported or not.

12- Previous version compatibility is supported or not. If your server version is new , can older version client connects to new server and vice-versa.

13- Area which needs more testing efforts.

14- Ask for bug reporting guidelines if any and you can narrow down to few things/parameters

            14.1- Found in release

            14.2- Target Release

            14.3- Developer contacts

            14.4- Severity guidelines of bug

15- Any 3rd parties software integration required etc

16- Automation scripts is available for this product or can this be automated etc.


These are some points which helps you to get started but I believe there will be many more such questions are present. I would to request you to share your experience in comment sections.

Robot Framework : Sample code to verify if Robot Framework is installed properly ? - part2

Sample code to verify if Robot Framework is installed properly ? 1. Create a file name test.robot and save it. *** Test Cases *** Sample ...