Showing posts with label Native App. Show all posts

Wednesday, January 13, 2016

Appium : How to get the activity name of android application

How to get the activity name of android application


For mobile app automation, Appium requires app activity name (usually the first screen of your app when you tap on app to launch it ) in desired capabilities parameter . To get the app activity name which Appium can use while launching an app. here are the ways you can use to get the same  

Step 1 : using the aapt command.

To get the aapt.exe , you have to navigate to android sdk folder then build-tools and goto some api version . for example(specific to my machine) 
E:\Android\adt\sdk\build-tools\android-4.4W 

open command prompt and run the below command 
aapt dump badging

for example : Let's take whatsapp application
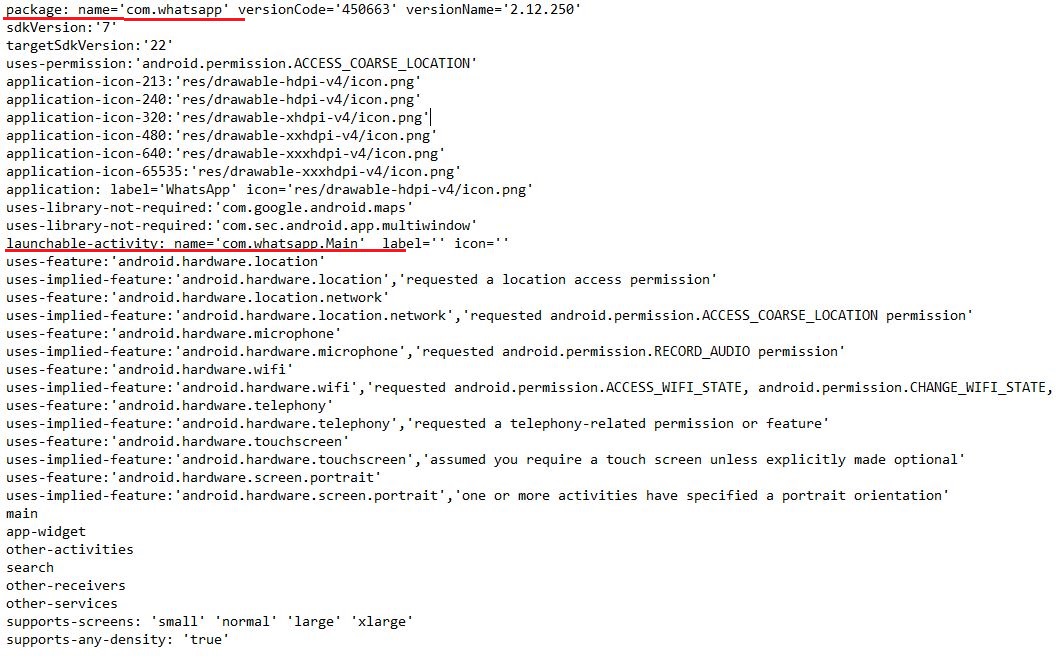
aapt dump badging E:\com.whatsapp.apk

output :
You can get the package name and launchable-activity with other details as highlighted in below :


Step 2: using Appium UI console


Sunday, December 27, 2015

Appium : Step by step Native IOS App Automation - Part 3(iOS Simulator)

In this Part 3 , we are talking about iOS Simulator command line commands.

How this will be helpful in automation:
This will helpful in checking/verifying your iOS app whether it’s working fine without Appium or any other automation tool in picture. Once you find your app works well then you can go for automation with Appium, this is just to save your time from unnecessary troubleshooting.

Here we start with some useful and important commands

1. To get the list of Simulators available in your system , you can type below command
-> Open Terminal and type below command
                        xcrun instruments -s

2. To launch Simulator using command line , you can type below command and provide same of simulator as you got from step 1 above
-> Open Terminal and type below command
$ xcrun instruments -w "iPhone 6 (9.2)”   // replace with your Simulator name

3. To install app on Simulator using command line once Simulator is up and running, you can type below command
-> Open Terminal and type below command
                        xcrun simctl install booted <app path>
                  e.g xcrun simctl install booted /Users/macuser/Desktop/UIKitCatalog.app

4. To launch an installed app on your simulator , type below command(you can also click/tap the app and launch in simulator using mouse )
-> Open Terminal and type below command
                        xcrun simctl launch booted <app identifier>  

// To get an app identifier or Bundle Identifier you can get it from info.plist file
     e.g xcrun simctl launch booted com.example.apple-samplecode.UIKitCatalog


if you are interested to learn more about all available subcommands you can get by running
          $ xcrun simctl

Hope this helps to get acquainted yourself with basic as well as important iOS simulator commands.click here for Part 2

In Part 4 , we will see the sample demo program of iOS Native App automation using Appium. Stay tuned.

Appium : Step by step Native IOS App Automation - Part 2 (Xcode)


In this Part 2, we are learning about Xcode usage like - building a project, running an application on iOS Simulator.

As you know Xcode is IDE provided for Apple software development. Once you build your project, you can deploy your app on Simulator. 

Now we start with creating a project in Xcode. Since we will be working with Sample IOS Application (UICatalog) which can be downloaded from link provided in Part 1


1. Once you download UICatalog Sample Code, go to the folder and click on UIKitCatalog.xcodeproj


2. It will open in Xcode and looks like this


3.Now on Xcode click on: Product -> Build for -> Testing and you will observe build Succeeded message

4. Again go to Product menu and click on Run, you will see iOS Simulator booting up.
 (Make sure to choose installed simulator on your Mac OS using - Product->Destination->IOS Simulator on Xcode)

5. You can see UIKitCatalog app installed on your iOS Simulator 

If you want to add more devices (iOS simulators), you can go to 

  On Xcode :  Window ->Devices , it will open a Devices Windows


You can go to bottom-left and click on + sign and add your simulator.

Hope this helps, click here for Part 1


Please stay tuned for Part 3, where you will learn running iOS simulator using command line etc.

Appium : Step by step Native IOS App Automation - Part 1 (pre-requisites)

Appium is an open-source mobile automation framework which supports automation on both iOS and Android platforms. It has become one of the most popular choice among mobile app automators.

In this post, I will walk you through the step-by-step setup guideline which are necessary before starting iOS automation. 

To setup iOS automation below are the pre-requisites:

1. Mac OSx machine 
    - supports OS X 10.7+ onwards

2. Xcode - (for supported version, visit http://appium.io)

   You have to download Xcode + Command Line Tools.
   - download Xcode from Apple App Store.

  - download Command Line tools follow the steps mentioned below
        -> Open Terminal and type below command  
                    $ xcode-select --install 
-> You will get software update pop-up, click on Install button.

3. Appium

 - download Appium app from http://appium.io


4. JAVA
   - download and install JAVA.
   - Once installed, configure environment variable in Mac OS as mentioned in steps below.
Step-1 Open Terminal and type below commands
                        $ open -e .bash_profile

Step-2 Save the below line
                         $ export JAVA_HOME=$(/usr/libexec/java_home)

Step-3 Refresh the file using below command
                         $ source .bash_profile

Step-4 Check if the JAVA_HOME is set properly
                         $ echo $JAVA_HOME


5. Eclipse / or any other IDE of your choice
 - download IDE of your choice, I will be showing demo using Eclipse IDE.

6. Install Homebrew (http://brew.sh)
   This is required to install software on Mac machine
          -> Open Terminal and type below command
                      $ ruby -e "$(curl -fsSL https://raw.githubusercontent.com/Homebrew/install/master/install)"

7. Install idevicceinstaller
         -> Open Terminal and type below command
                     $ brew install --HEAD ideviceinstaller

8. Download Sample iOS App project ( UICatalog) from below link:


Please stay tuned for Part-2which continues with some basic knowledge and troubleshooting steps required for iOS automation like building a project in Xcode, installing .app on iOS simulator etc.

Testing a New Product: Essential Information Software Testers Must Gather in the AI Era

    Learn what information software testers must gather before starting testing a new product, including AI, automation, compatibility, and ...